
Personalized Baby Quilt Tutorial
- Oct 25, 2022
- 6 min read
Updated: Sep 26, 2023

New Video Tutorial:
This particular type of quilt holds a dear place in my heart! I made the first one five years ago, when I was first learning to quilt, for my youngest daughter. She is now 5 and sleeps with it every day at nap time! I've probably made close to 200 of these to date and they are too sweet not to share. **Love the quilt but don't want to make it yourself? These are available to customize in my Etsy shop or contact me!**

If you're looking for the secret to getting clean, perfectly cut names and don't want to read the whole tutorial....the secret is HeatnBond Lite. You're welcome!
Below are the supplies I use to create a 32" x 32" quilt. These are all of my absolute favorite supplies that I use daily. However, everything can be substituted, and things like the light box, x-acto knife, and quilting ruler aren't totally necessary, they're just nice to have!
Supplies
HeatNBond Lite - Don't skip this!
1 yard of White Kona Fabric- or your favorite fabric for the front
1 yard of backing
Crib-sized white cotton batting (I use this kind, but any batting can be used here)
Light Box- or another source of light, like a window
Detail Scissors- these are my FAVORITE but technically any kind would work
X-Acto Knife- not totally necessary but it makes small details easier
White cotton thread- or coordinating color
6" x 24" Quilting Ruler- or long straight edge
Set-Up:
Cut the white/front fabric to 32" x 32"
Cut the batting fabric to 34" x 34"
Cut the backing fabric to 36" x 36" and save the extra for your name.
I'm going to explain how I create my name below... Another option would be to skip the computer and printer and free-hand what you want your name to look like! Keep in mind, your name needs to be thick enough to trace, cut, and sew. If you're drawing your own name, skip ahead to the free-hand portion. I will give an overview of the steps in each section and detail each point more below it.
Creating the Name: Online
I create the name for my quilts in PicMonkey. I like to offer my customers a set of font options, and PicMonkey has a lot of cute ones! My favorites are below.

When looking for a font, or even when creating your own, you want to pick one with some substance as you have to cut this out and sew along the edges. Bold fonts usually work best!
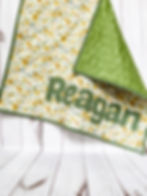
This quilt is utilizing #5, "Jeremy" font.

Printing Directions:
Select a font for the name, type it out, download the image and print it.
Scan your printed name.
Enlarge the name to your desired size then print on several pages. Details on this are below.
I have a very simple/cheap printer that I bought years ago (here's a link to it if you're curious!). One of the best features, despite its simplicity, is the HP app that goes along with it. I can take my printed name, scan it and view it on my app. From here, I can edit and enlarge the name, then print it on several pages.
For my smaller quilt (32" x 32"), I print the name about 2.5 pages long....why? Bear with me while I insert some math... I'm printing the name in portrait orientation, meaning, if I print the name on one single page, it will be about 8.5" long- the same size as a standard sheet of paper (8.5" x 11"). If I enlarge my name to about 2.5 pages long, my name will be about 21" (2.5 pages x the paper width of 8.5"= 21.25"). I hope that makes sense! Worst case scenario, print the name and see what it looks like! If it's too small, enlarge it, and vice versa. I've wasted more paper than I care to admit figuring out this stuff!

Creating the Name: Free-Hand
If you want to skip the computer and printer, another option to create the name is to simply draw it. Tape together 2-3 pages of plain paper. Sketch out your name, remembering to keep it thick enough to cut and sew.
Tracing/Fusing the Name:
Once the name is printed, it needs to be traced using the most important part of this whole deal. Without it, I promise....your name will not look nearly as neat. HeatnBond Lite for the win! I use it daily with name quilts, attaching quilt blocks to the backs of sweatshirts, applique, etc. This $7 roll lasts me through many projects. It's strong and doesn't gum up my needle at all. You can't do this project without it!
Directions (more details about each step are below):
Tape your printed (or hand-drawn) name pages together.
Flip your pages over so the wrong side is facing up.
Take your HeatnBond and place it on top of the upside-down name.
Trace your name on the smooth side of the HeatnBond.
Fuse your traced name ON THE BACK of the extra backing fabric, according to the HeatNBond instructions.
Carefully cut the name out using detail scissors. An X-Acto knife can make the inner lines easier.
Remove the paper from the back of your name.
Use a long ruler and align the 4" line along the bottom of the quilt. Using the edge of the ruler, place your name straight, along the bottom right corner of your front fabric.
Fuse your name (using the package instructions) onto the front of your white fabric (or front quilt fabric).
More instruction details: After piecing the printed name pages together with tape, flip it over to the back side (wrong side). You want to trace your name or anything you applique upside down so that it's facing the right way at the end. Lay the HeatnBond over it, with the smooth side facing up. (The rough side is the adhesive, don't trace on that). Then, I use my daughter's drawing lightbox (which has now become my drawing lightbox) in a dark room to trace the name onto the adhesive. In the past, I just taped everything to a well-lit window and this worked just fine!
Using an iron, fuse the traced name onto the back of your extra backing fabric according to the package instructions. Then, carefully cut your name out. For this part, I find that an X-Acto knife works best inside curved areas, such as the inside of an O. In these tough areas, I make a 1" cut along the line and then use my scissors to do the rest.
Next, remove the paper backing from your name. I place my name 4" up from the bottom and 4" from the bottom right side on the front white fabric (so my name is right aligned on the long side-see photo). To do this, I take a long 24" ruler and align the 4" mark along the bottom of the white fabric. This gives me a consistent line to place my name on so I know it's straight. From here, we fuse the fabric onto the front according to the HeatNBond package instructions.
Sewing the Name and Finishing your Quilt
Sew around your fused name about 1/8" away from the edge, backstitching when starting/stopping.
Repeat this for the insides of letters.
Iron the front/backing fabrics.
Sandwich together your fabrics and batting to get ready for quilting.
Quilt however you'd like!
Double-fold the backing onto the front fabric all the way around the quilt to create the binding and clip it in place.
Sew around the binding.
Admire your work!
More details: Carefully begin sewing around your name, about 1/8" away from the edge or less. You may choose to do a zig-zag stitch or another decorative stitch, which will look beautiful! Using a straight stitch around the edge is referred to as 'raw edge applique' and it's my personal favorite! After washing, it frays a little and creates a soft, loveable quilt that longs to be snuggled! I set my stitch length to about 2mm for this job which allows me to carefully and continuously sew around the curves. Be sure to backstitch when you're finished.

Take this baby to the ironing board, one last time, and then get your quilt sandwich on! The 32" x 32" white fabric, now with the name, is on top, facing up. The 34" square piece of batting is in the middle, and the 36" square piece of backing is in the back. Take care to make sure the pieces are all centered. You should have 2 inches of backing showing on each side of the white fabric. This is used later to create the binding, and is an important step. From here, quilt your favorite design. I usually keep my quilting designs simple with either an all-over meandering or swirl.

You're almost done!
We have left 2" inches of backing around each side of the quilt to create that beautiful, thick binding. Working your way around the quilt, fold the raw edge of the backing to meet the edge of the white fabric, then fold it again over the white fabric. We are basically just double-folding the backing up over the white front and then clipping it in place using our sewing clips. Go back to your sewing machine and stitch over the folded binding edge you just created using a 3mm stitch length. In the photo below, you can see how I sew the corners.

You're finished! Gift this beauty to your favorite new baby or save it for your own :) Please feel free to contact me with any questions!