Easy Baby Quilt Pattern with Simple Borders – Perfect for Beginners
- May 26, 2025
- 3 min read
Updated: May 26, 2025
Today I’m excited to share another free baby quilt pattern with you — and yes, it’s totally beginner friendly! This sweet little quilt features fabric from Unique Fabric Panels, and it's the perfect project if you’re just starting your quilting journey or looking for a quick and fun make.

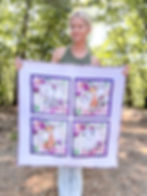
When I was browsing fabric, I came across the Jungle Safari Animals in Purple panel and fell in love instantly. The animals are so adorable, I could barely decide which ones to use! This panel includes six 12" x 12" squares — but for today’s quilt, we’re using four of them and pairing them with a soft lavender floral backing.
The best part? I’m walking you through a super simple way to add borders, even if your fabric cutting skills aren’t quite perfect yet (yes, we’ve all been there!). This method gives you a little flexibility... no need for exact measurements, and it still turns out beautifully.
This pattern is very versatile too — change the border sizes, swap the fabrics, add extra rows — make it your own!
🧵 Is This Pattern Right for You?
This baby quilt is beginner-friendly, but you’ll want to be comfortable with:
Basic cutting
Using a ¼" seam allowance consistently
✨ New to quilting? I’ve got you covered! Check out my Beginner Quilting Series where I walk you through everything — from cutting to piecing to binding.

Fabric & Supplies
1 panel from Unique Fabric Panels (or four 12" blocks)
¼ yard border fabric
1 yard sashing fabric
1.5 yards backing & binding fabric
Get 5% off with code SOUTHERNSEWINGCO at checkout on Unique Fabric Panels’ website or Etsy shop!
Finished Quilt Size: 33" x 33"
Fabric used in this quilt:
✂️ Cutting Instructions
(Assumes 44" fabric width)
Cut 4 panels to 11.5" squares (trimming off any white edges)
(5) 1" strips from border fabric (for block borders)
(2) 1.5" strips from sashing fabric
(4) 4.25" strips from sashing fabric (for quilt top borders)
(4) 2.25" strips for binding (from backing fabric)
🪡 Let’s Sew!
Add Borders to Each Block:
Take one panel and sew a 1" border strip to the right side, right sides together. Trim excess. Repeat on the left side. Press and square. Then repeat on the top and bottom.
- Repeat for all 4 blocks. Your finished blocks should be around 12" square.
Plan Your Layout:
Decide how you want your blocks arranged — two on top, two on bottom.
Add Sashing Between Blocks:
Take a 1.5" sashing strip and sew it to the right side of the top left block. Trim the extra and save it. Sew the top right block to the other side of the sashing. Press and square. Repeat for the bottom two blocks.
-Now join the top row to the bottom row using your second sashing strip. Press and square.
Add Outer Borders:
Just like with the blocks, sew a 4.25" border strip to the top of your quilt top. Trim, press, and repeat for the bottom. Then sew the remaining strips to the left and right sides. Press well.
🎉 Your quilt top is done!
Finish Your Quilt:
Make your quilt sandwich (top + batting + backing), baste, and quilt using your favorite method. I used a small meandering stitch around the borders to keep it sweet and soft.
Bind using your favorite method — and you’re done!
💕 Final Thoughts
This little quilt comes together quickly and leaves lots of room for creativity — and I love that it starts with something as fun and inspiring as a fabric panel! Whether you’re making it as a gift, for your own little one, or just for practice, I hope this pattern brings you joy.
Don’t forget to share your finished quilt and tag me on social — I’d love to see what you create!
-Ashley