
How to Hand-Embroider a Swaddle Blanket
- Jan 30, 2023
- 5 min read
Updated: Jul 12, 2024

*AVAILABLE NOW: New Personalized Hand-Embroidered Swaddle Kits! If you don’t feel like purchasing everything separately, I’ve created a kit, just for you! This includes everything you need including your choice of swaddle and thread plus a personalized piece of stabilizer in your choice of font! Click here to shop: https://www.southernsewingco.com/product-page/hand-embroidered-swaddle-kit
In my previous tutorial, Hand-Embroidered Swaddle Tutorial, I detailed the supplies needed and the steps to create these beautiful blankets! This has by far been my most popular tutorial and I have gotten numerous questions and comments. In this post, I thought I would expand on my original tutorial. It will be a little more in-depth about chain stitching and try to answer some of the common questions I have been seeing!
Here is a start-to-finish video guide that dives deeper into the process on Canva and chain stitching! A quick note: if you plan to use your own handwriting, you can skip the Canva explanation in the beginning.
Quick Jumps:
In Canva:
Open Canva (this explanation is the same for both a desktop/laptop and a mobile device). Create a new Instagram post and from there select a blank template. Click 'Text' and then add a text box. Find the 'Harmonie' font, which is free! Type out the name of your baby. Next, resize it to about 340. Basically, it needs to fill out the white area. Adjust this as needed. Click to download this image and then print it!
If your name is longer, you may have to size down and vice versa.
Tracing your name:
Supplies
Lightbox or another light source
Before getting started here, ensure that your name fits into your embroidery hoop. Next, we need to trace the name onto the stabilizer. Use a lightbox, or if you don't have one just tape your name and stabilizer over a window, and trace the name. Set your lightbox aside.
Prepping your swaddle:
Supplies
Swaddle Blanket or Double Gauze Material (more on this below)
**About the swaddle: Double gauze is soft, snuggly, and great for swaddles! While this tutorial will work for any type of swaddle blanket, you can purchase double gauze material, hem the edges and now you have a swaddle! A little cheat that I've found- buy an already-made swaddle (which is what I always do) and embroider it. I purchased all of my swaddles from Sugar House Swaddles- they're fantastic quality, big (47"x 47"), come in a variety of modern colors, and are inexpensive. I can't buy the fabric and make it for this price, so I purchased it from them. And no... I do not get paid to advertise for them...I just think they're that great! Amazon also has many great swaddles that are 100% organic muslin cotton and inexpensive. Here is one that I love.**
Figure out where you would like to embroider the baby's name. I usually like to use the corner furthest from the tag and have the name facing out. More on this later. Fold the two sides of the corner of the blanket together and then iron. This creates a center-line crease that you can use for name placement.

Getting ready to embroider:
Supplies:
Embroidery Hoop (I use the 10" hoop for my swaddles)
2 Skeins of Embroidery Floss
Hand-embroidery needles
Fold your piece of stabilizer in half and create a crease to find the center line of the name. Match up the center line you made in the stabilizer with the ironed crease on the blanket. Put both of these materials inside the embroidery hoop. Flip the hoop over to the backside. While keeping that center line in the middle of the hoop, gently pull the swaddle blanket from each side so that it's nice and flat in the hoop. Don't pull too tight or your stitches will look bunched up when you're finished. You shouldn't see any kind of puckers at the edges of the inside of the hoop.
Take a long piece of embroidery floss and thread your needle. Tie a double/triple knot on the other end. You are now ready to embroider!
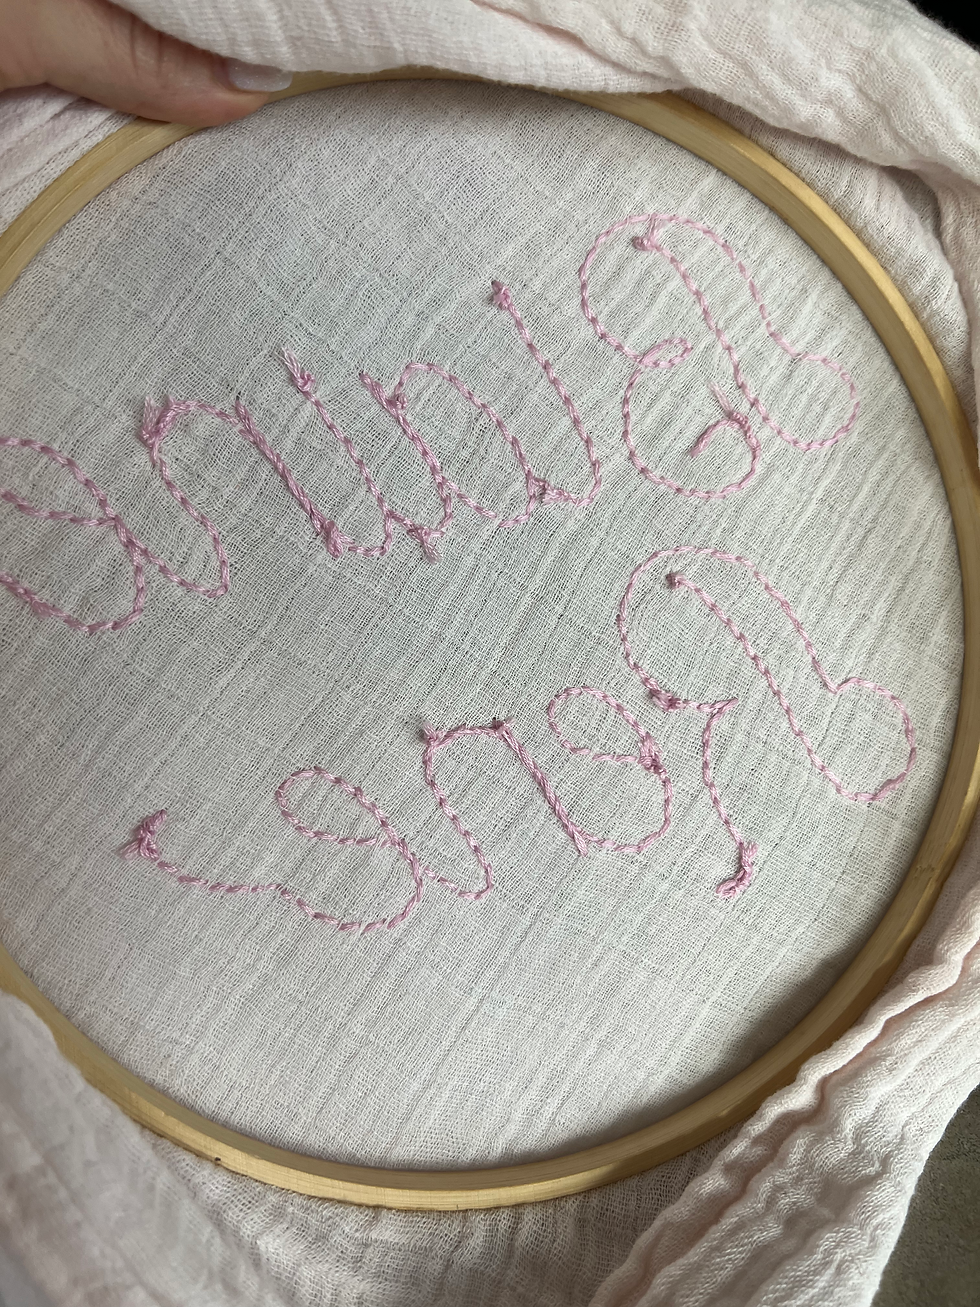
The Chain Stitch:
In the video above, I got into depth about how to create a chain stitch and some tips that I've found helpful during the embroidery process.
More about the chain stitch and some tips:
I love the look of a chain stitch on these swaddles. However, use whatever stitch you think looks good!
To keep the chain stitch looking smooth I've figured out some tips to help:
Be consistent with the spacing of each stitch. It may be necessary to go a little smaller around curves but don't take big steps to get to the end faster. You'll be able to tell! Take your time and enjoy the process.
Be mindful of the path you take while going over your traced name. I will always start at the top of a line, work my way down to the end, then go back up to the top of the next line. I try to explain this more in the video above.
Periodically, check the back of your work to make sure threads haven't gotten tangled. This is a pain to fix.
Lastly, if you need to take out a stitch or two and try again, don't worry. Pull your thread from your needle and carefully work backward...then re-thread your needle and start again.
Finishing your Swaddle:
Supplies:
Bowl of warm water
After you've finished embroidering, unhoop your work. Carefully cut away the excess stabilizer, taking care not to cut into the swaddle (speaking for a friend ;) ). Soak your embroidery in warm water for about 15 minutes. Rinse thoroughly and then toss in the dryer. Once dry, if you feel any leftover residue on the blanket, simply rinse again or put in the gentle cycle of the wash. I promise it won't harm your work! I've washed our swaddles countless times.
Hopefully below can help to answer some questions you may have!
What does the back of the swaddle look like?
Don't judge a swaddle by its cover. While everyone seems worried about the back, I don't think the recipient will care if it's a little messy! Above is a photo of the back of my latest swaddle. By keeping a finger over the hole I'm creating with my needle on the back, I can make sure my thread isn't getting tangled back there as I pull it through. Every so often, check and make sure everything looks good! Mine is not perfect. You can clearly see the knots I use to start my work, but I'm okay with that.
What font do you use?
The font that I primarily use is the 'Harmonie' font on Canva. It's free to download!
What kind of stabilizer do you use?
I've been using the Brothread Wash Away Stabilizer from Amazon and love it. It soaks off. You do need to rinse after soaking. I throw my swaddle in the dryer after and Viola!
Where is the best place to embroider on the swaddle?
The sky is the limit! Pick your favorite spot. Generally, I always pick the corner opposite to the tag on the swaddle. Then, I face my name toward the corner. This is so the sweet baby can be snugged up tightly and the named corner can be folded over and still be seen.

I hope this tutorial helps! Tag me @southernsewingcompany on Instagram and show off your new creation. Feel free to leave any questions below. I will gladly help!


How do you stitch the dot for the I? I can't tell if it is a French knot, satin stitch or how you did it to match the chain stitch so well!